Monday 9 February 2015

On The Workbench Today...

Nuke em'

One thing I wanted to run on Cradley Bridge was an example of the nuclear flask train. One runs past where I live every now and then - but always at weird times of the day and I've yet to get a decent look at it. Luckily Bachmann have produced a model of the FNA nuclear flask wagon and its a pretty good one too. They've issued a number of variants with different styles and running numbers - I had collected 3 in total which I reckon will give a pretty good representation of a typical Nuclear Flask train - couple that with 2 Bachmann Class 37's in DRS livery and the job will be sorted!


Here are the 3 wagons in my collection - 2 have the large oval headed buffers and one has the large round head buffers. Bodywise they are all the same, but the decals/numbers are different on each, which is a real bonus and saves a lot of time renumbering. The first thing I did was to take off the bogies so as to paint them and their wheels.


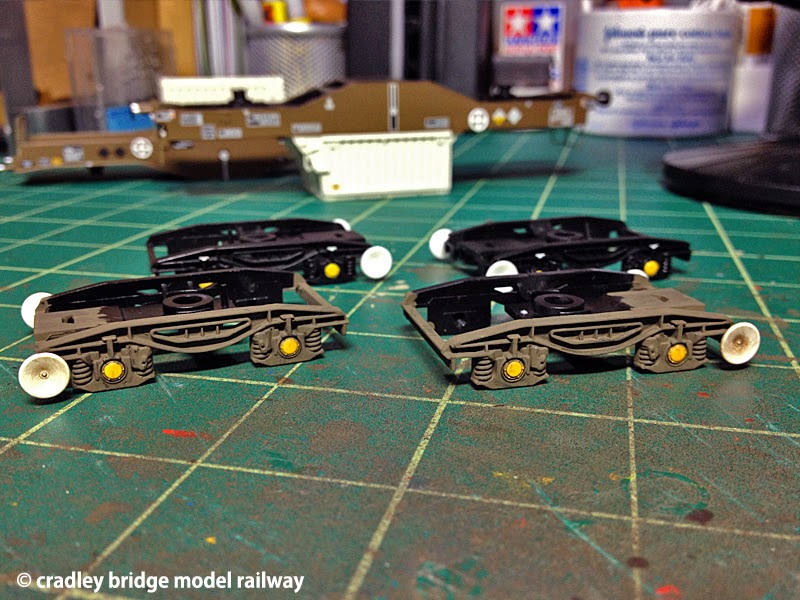
Whilst these were drying I painted up the wheel sets and added my now standard detailing lift of adding brake disc etches to the outside of each wheel.


I'm using my favourite brand of Colin Craig etches but have gone for a slightly different size than usual as these wheelsets are slightly smaller than normal Bachmann ones (I had the same problem with the Bachmann BDA's and BBA's) and this size of etch fits them perfectly and makes a hell of a difference.


Once these were all done and had sat drying for a while they were then reunited with the bogie frames and were then checked for running quality (sometimes the wheel sets/axles need a bit of fettling to achieve free funning - especially as I check and regauge all my wheels with a BTB gauge). Next up the wagons had their air brake pipes attached (usefully supplied and pre drilled by Bachmann) and I fixed coupling hooks for the scale link couplings that will be used - apart from the wagon that will be last in the rake. This uses the supplied Bachmann imitation screwlink. I did swap the attached tail lamp for one of my more realistic Sprinside jewelled modern tail lamp.


I then started to carefully weather each wagon to represent the careworn appearance that they seem to take on - basing each on on slightly different photographs that I'd found on t'internet. Various light and dark washes were painted on and wiped off to give the tatty but still legible effect you see here. I've since added grease to the buffer surfaces, fitted correct scale couplings and weathered the interior decks of the wagons a bit more. Really pleased with how these have turned out and can't wait to get them behind a couple of sound chipped DRS 37s.

Just after finishing this project I was sorting thru my project draw and found a couple of S Kits resin kits for some earlier FNA's. So I decided to start to build these too and intend to run these in an earlier guise with RNA barrier wagons and Class 31 haulage. They go together very easy - the only thing thats going to be a pain is putting the many transfers on them from the Fox Transfers decal set.


For now this is as far as I've got with them. Once painted they will receive a coat of gloss varnish before being decaled up. I will post an update as to how I get on with them soon.

New Year - New Start!!

SPA Weekend

Wow… where did January go? It only seems 5 minutes ago that I was looking forward to Christmas and the usual rounds of eating and drinking and family get togethers…blink and we were at New Year, blink again and January had come and gone!! To be fair I had work commitments in January and the travel to and from where my contract was just about wore me out - which left very little time at all for modelling activities. Still now that contract has finished I have a bit of time to get back into the mass of projects I have on the go - so what better way to start than having a SPA weekend!!?? This, however, isn't the sort which involves towel robes, steam baths and detoxing, but instead utilises a new model from a new company that modellers have wanted for a while.

The company - FTG (Filling The Gap) models aims to produce wagons that the mainstream companies will probably never replicate - either because of limited interest or the fact that most of them seem to be way off fulfilling their current production models, let alone planning for new ones. This will hopefully be the first of many wagons from this company that literally do 'fill the gap' and allow you to make up realistic rakes of stock without resorting to the full 'build from a kit' approach. The model isn't perfect - but then what model is - the couplings being the main issue - they are too far back. That said I'm changing them to scale 3 link instanter couplings so it doesn't affect me in the slightest.

So lets look at it in a bit more detail; the first round of releases of the SPA consists of 2 plain Railfreight and 2 Cardiff Rodmill liveried wagons, all with different running numbers. I decided to purchase the 2 plain Railfreight examples to run in some of the steel train rakes that I will be producing.


They come with a removable cradle that represents the wooden based version in the real wagon - these were always in a bit of a state so hopefully I can weather them accurately to represent this. The way they are made means the wagon can take steel or wire coils - or they can be removed completely so as to enable you to put in whatever you want load wise.


Some of the detailing on the SPA is a little crude/basic but once they are weathered up and detailed I think they will look great - just wish I had purchased a few more as they are now pretty much sold out! Guess I will have to wait for the next batch to be released.


First thin I did was to whip the wheel sets out and paint them and the underframe with my weathering base coat of Precision Paints frame dirt. I also fitted the wheel sets with Colin Craig brake disc etches which really helps lift the realism of any wagon. I also fitted the hooks for my scale 3 links and Shawplan cast air brake pipes at each end.


Once this was done and dry, I gave the interior its first weathering base coat of Precision Paints Dark Rust. This will have a number of dirt and rust washes applied to help bring out the worn interior. Weathering powders will also be used. I'm still debating what to load it with yet - I'd like to use some of the loads from the Duha range, but the particular one I want is proving hard to find.

So thats where this little weekend project has got to at the moment. Since taking these pictures I've also painted the buffer shafts with a chrome paint - the next stage will be the start of weathering the exterior - I just have to decide how 'used' I want these to look.